Cloudflare migration: what you get beyond hosting
Moving to Cloudflare Pages is straightforward. What most people miss is the security and identity stack that comes free with it: Zero Trust, Access, Tunnel, and WAF.
GTM Architect & Growth Operator · Now · 18 May 2026
TL;DR · Key insights
- Cloudflare Pages is the obvious reason to migrate. Zero Trust Access, Tunnels, WAF, and DDoS protection are the less obvious ones.
- Cloudflare's free tier includes a security stack that would cost hundreds per month from point solutions.
- Zero Trust Access replaces VPN for internal tools: one config, no server to maintain.
- Tunnels expose local services without opening firewall ports. Useful for demos, staging, and development.
- The catch: it's all Cloudflare-native. Useful if you're already in the ecosystem, lock-in if you're not.
The previous article covered the rebuild of this portfolio on Astro and Cloudflare Pages: the stack, the multi-agent workflow, the Terraform config, and the deployment model. That article was about building the site. This one is about what came with the platform: a security and identity layer that most people overlook because it is not the reason they signed up.
Why this matters
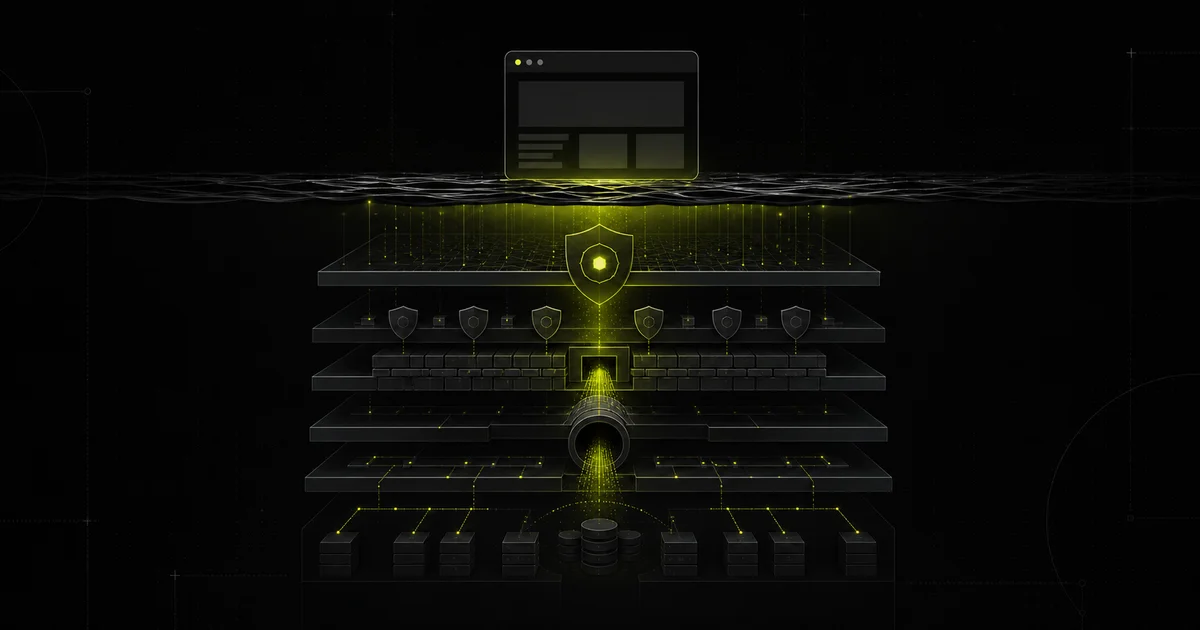
Most people think of Cloudflare as a CDN with a registrar attached. That framing made sense ten years ago. In practice, the platform now ships a complete security stack that is available on the free tier: managed WAF, DDoS protection at L3 and L7, Zero Trust Access, Tunnels, WARP, Bot Fight Mode, and rate limiting.
If you were to assemble equivalent point solutions: Akamai or Imperva for WAF, Okta or Duo for identity proxy, Tailscale or WireGuard for tunnels, Cloudflare itself or Fastly for CDN: you would be looking at hundreds of dollars per month before reaching enterprise tiers. On Cloudflare’s free or Pro plan, most of this is included.
The catch is that none of it is automatic. You get access to these capabilities when you migrate; you have to switch them on.
Hosting and deployment
Before the security stack, the baseline: Cloudflare Pages is the hosting layer. The site is a static Astro build. Every push to the main branch on GitHub triggers a build on Cloudflare’s side and a deploy to the global edge network. Branch pushes get their own preview URL, so a change can be reviewed on a real domain before it reaches production.
- Commit git push
- GitHub main branch
- Cloudflare Pages build + deploy
- Live edge CDN
There was a real choice here. Vercel and Netlify are the obvious alternatives, and both are excellent products. The deciding factor was consolidation.
Cloudflare Pages
chosen- One platform: hosting, DNS, WAF, Zero Trust, Tunnels: one API, one bill
- Free tier covers unlimited bandwidth and the full security stack
- Same edge network as the CDN already proxying the domain
Vercel
alternative- Best-in-class framework DX and the most polished preview workflow
- First-class Next.js support and serverless/edge functions
- A separate platform: DNS and security would live elsewhere
Keeping hosting on Cloudflare means DNS, CDN, WAF, Zero Trust Access, and the deployment target are all the same platform, configured through the same API. For a site that leans on the security stack described below, splitting hosting onto a separate provider would mean managing the edge in two places. Vercel is the stronger product for framework-heavy applications; for a static site that already routes through Cloudflare’s network, Pages is the lower-friction choice.
Cloudflare WAF and DDoS
When a domain is proxied through Cloudflare (the orange-cloud setting in the DNS dashboard), L3 and L4 DDoS protection activates immediately. This is not configurable or optional: it is on by default for all proxied traffic. Cloudflare’s network absorbs volumetric attacks before they reach the origin.
Layer 7 DDoS protection: HTTP flood mitigation: is also available on the free tier via the managed WAF rules. These cover common attack signatures: SQLi, XSS, known exploit patterns, and bad actor IP ranges.
Bot Fight Mode is a one-click setting that challenges known bot infrastructure. For a static portfolio, the practical effect is minimal: there is no login form to brute-force or API endpoint to scrape: but it is still worth enabling: bot traffic inflates analytics, consumes bandwidth, and sometimes probes for paths that do not exist.
Rate limiting on the free tier is basic: a single rule up to 100,000 requests per ten minutes. For a personal site, this covers the realistic threat surface. For a high-traffic application, you would need the Pro plan or above.
One behaviour worth knowing: if you enable “Block AI bots” from the Cloudflare dashboard, it injects Disallow rules for ClaudeBot, GPTBot, Google-Extended, and others into a synthetic robots.txt: overriding your repo’s own robots.txt. This was the cause of the AI-indexing issue documented in the previous article. The fix is to disable that toggle and let the repo-level robots.txt control access.
Zero Trust Access
Cloudflare Access is an identity proxy. It sits in front of any URL you define and enforces an authentication check before forwarding the request to the origin. The user never touches your server directly: they authenticate against Cloudflare first.
The practical use case is internal tools. If you run n8n, Grafana, Supabase Studio, or a staging environment on a private server or VPS, you typically have two options: open a port to the internet (bad), or set up a VPN (maintenance overhead). Access is a third option: keep the port closed, put a Cloudflare Access policy in front of the hostname, and let Cloudflare handle authentication.
The configuration is straightforward:
- Add the hostname to Cloudflare DNS (proxied).
- Create an Access application in the Zero Trust dashboard, point it at the hostname.
- Define a policy: allow users matching an email pattern, a GitHub org, or a Google Workspace domain.
- Users visiting the URL get a Cloudflare-hosted login screen. They authenticate via email OTP, GitHub OAuth, or Google: no account creation on your side.
The free tier supports up to 50 users. That is enough for most solo operator and small team setups.
Where this is particularly useful: giving a contractor or external stakeholder temporary access to a staging environment without creating them an account anywhere, without opening a port, and without sending credentials over Slack.
Cloudflare Tunnel
Tunnel solves a different problem: exposing a locally running service through a public URL without opening firewall ports.
The mechanism is a persistent outbound connection from your machine or server to Cloudflare’s edge. The cloudflared daemon establishes the tunnel. Cloudflare routes inbound requests through it to whatever port you specify locally. No inbound port needs to be open on the host.
The tunnel is persistent: it does not expire when the session closes, unlike ngrok’s free tier, which terminates tunnels when the process stops and assigns a new URL on each restart. A named Cloudflare Tunnel keeps the same hostname indefinitely.
Typical use cases:
- Local dev with a real URL. Webhook testing, OAuth callbacks, or sharing a WIP with a client without a deploy cycle.
- Demo without infrastructure. Run the app locally, hand someone the public URL, close the tunnel when done.
- Self-hosted services on a private network. A Raspberry Pi or home server running Home Assistant, Jellyfin, or a personal API can be accessible via a clean domain without a public IP or port forwarding rules.
Compared to ngrok, Cloudflare Tunnel is free, persistent, has no bandwidth limits, and integrates directly with Access policies: so you can put authentication in front of a tunnel with two config changes.
WARP and private networks
WARP is Cloudflare’s device client: a WireGuard-based agent that connects the device to Cloudflare’s Zero Trust network. In practice, it functions as a lightweight VPN replacement.
The use case within Zero Trust: if you have multiple machines: a development workstation, a staging server, a build machine: you can enroll each in WARP, define a private network range in the Zero Trust dashboard, and route traffic between them through Cloudflare’s edge without any of the machines needing public IPs or open ports.
This is not a full mesh networking solution. For complex service-to-service networking, Tailscale or WireGuard with a coordinator node is more flexible. But for a small setup where you need a developer’s laptop to reach a staging database or a private API endpoint, WARP with a simple network policy is a ten-minute configuration that replaces a VPN server you would otherwise have to maintain.
The open source alternative
Everything described above has open source equivalents. Caddy with Authelia handles authentication proxying similar to Zero Trust Access. WireGuard or Tailscale handles private networking similar to WARP and Tunnel. Fail2ban and ModSecurity handle WAF-like filtering.
The honest comparison:
| Cloudflare | Open source | |
|---|---|---|
| Setup time | Minutes | Hours to days |
| Ops overhead | Near zero | Ongoing |
| Vendor lock-in | High | None |
| Cost | Free to low | Infrastructure cost |
| Flexibility | CF ecosystem only | Arbitrary |
If privacy and vendor independence are the constraint: or if you are running infrastructure that cannot route through a third party: the open source path is the right one. WireGuard in particular is worth running regardless of what else you use; understanding the protocol is useful.
If the constraint is time and operational overhead, Cloudflare’s stack wins on practical grounds. For a solo operator or small team without a dedicated ops function, the tradeoff is straightforward.
The catch
Everything in this stack is Cloudflare-native.
WAF rules, Access policies, Tunnel configurations, rate limiting rules: none of this is portable. If you migrate off Cloudflare, you rebuild these layers from scratch on whatever platform you move to. There is no export format, no open standard for Access policies, no Terraform provider that makes your WAF rules work somewhere else.
For a personal site or small internal toolset, this is an acceptable tradeoff. The configuration is simple enough to reconstruct, and the operational savings over three or four years are significant.
For an organisation with compliance requirements, or one that needs multi-cloud portability, the lock-in is a real cost. Infrastructure-as-code (Terraform with the Cloudflare provider) at least keeps your config version-controlled and reviewable: but it still only runs against Cloudflare’s API.
The practical rule: use Terraform for all Cloudflare config from day one. Dashboard-only configuration is invisible drift that becomes a migration liability.
Observability
WAF and DDoS protection tell you the site is reachable and shielded. They do not tell you whether the code running in a visitor’s browser is throwing errors. That is a separate concern, and it is not one Cloudflare covers.
For wojciech.io, that layer is Sentry. It is not a Cloudflare product: but observability pairs naturally with the hosting and security stack, and the free tier is enough for a site this size. The SDK initialises only in production builds, captures unhandled errors and a sample of performance traces, and reports them to a dashboard with full stack traces.
The practical value is signal quality. For a static site there is not much that can break, so an error in Sentry is a real event rather than background noise. When something does break: a third-party script, a browser-specific API, a bad deploy: it surfaces with a stack trace instead of waiting for a visitor to report it.
What I use
For wojciech.io, the active Cloudflare stack is:
- Pages: production hosting, branch previews, custom domain
- WAF managed rules: on by default via proxied DNS
- Bot Fight Mode: enabled
- Zero Trust Access: in use for two internal tools
Planned: a persistent Tunnel for local development access: replacing the current workflow of starting ngrok when needed.
The Access configuration took about fifteen minutes to set up. The WAF and Bot Fight Mode were one-click. The operational overhead since enabling them has been zero.
Closing
Migrating to Cloudflare Pages is primarily a hosting decision. But the security stack that comes with it: WAF, DDoS protection, Zero Trust Access, Tunnels: is the less obvious reason to stay.
If you are already on Cloudflare, most of this is available now. Enable Bot Fight Mode, turn on the managed WAF rules, and if you have any internal tools, set up a basic Access policy. Most of it takes fifteen minutes and costs nothing.
Related: How I rebuilt my portfolio with Astro and Cloudflare Pages · GTM AI Agent Starter Pack